各位畢業設計的苦行僧,想必大家都是靠著破爛英文+谷狗翻譯
還有不知從哪來的丐幫自學慧根,搞懂所有的參數設定
今天這篇用以紀錄渲染玻璃材質的Vray教學...
重點就是要一張具有透明材質的去背圖
怕它消失,直接轉貼吧XDDDD
**********************************************************************
V-Ray Settings Overview
by Alex Hogrefe | May 17, 2015 | Fundamentals | 74 comments
A lot of you have been asking for V-Ray settings and so I am going to spend a little time going over the settings that I used to create the base rendering of the main street perspective in the previous post. I have been using V-Ray for over a year now and I am in no way paid by V-Ray or affiliated with the company. I simply tried out a lot of different programs and found V-Ray was the best at meeting a lot of my needs. The most important of these were simplicity and flexibility. Right out of the box, V-Ray generates nice renderings. You will notice that I don’t vear too far from the default settings, but instead use settings that will provide the best ratio of fast rendering times and good outputs. Another very important point that I want to make is that I am not trying to produce the perfect V-Ray rendering each time. I am simply trying to get close to what I want and then refine the lighting and colors in Photoshop. This way of thinking maintains my sanity and minimizes the amount of test renderings and setting adjustments that need to be made.
Render settings are obviously a big topic to cover and there are many different rendering situations like interior shots, dusk shots, and daytime shots that require different setups. To keep things manageable, this first post will be an overview of the basic concepts that I use for setting up a daytime rendering scene. Things like material setup, AO passes, dusk and interior shot setup will come later.
Before getting into the settings, there are a few more notes. I am using V-Ray for Sketchup. This means the V-Ray interface is running inside of Sketchup. Things like the sun, cameras, and materials all speak to each other between the two programs. Changing the sun angle in Sketchup will change the sun angle in V-Ray. I typically adjust the sun angle in Sketchup to get the shadows exactly where I want them before moving to V-Ray. I also save the Sketchup scene that I plan to render in V-Ray by going to “View>Animation>Add Scene”. This is especially important if I am going to overlay Sketchup image exports on top of the V-Ray renderings or if I need to render the same view later on down the road.
V-Ray Dialogue Box
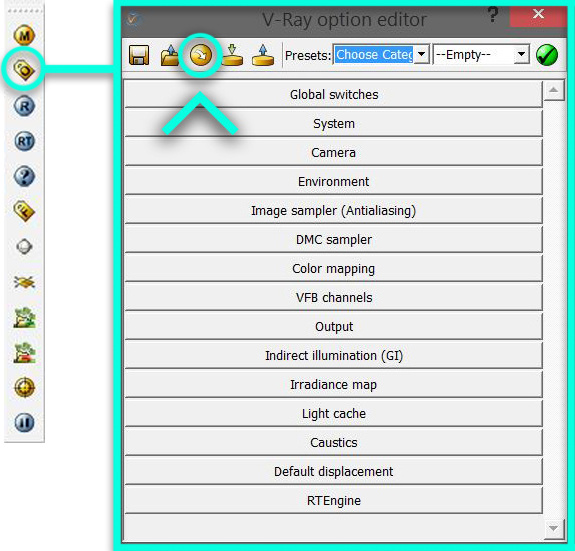
The V-Ray settings dialogue box uses tabs that expand and contract keeping the settings a little more manageable to navigate. An important button to be familiar with is the “Load Defaults” button. This will take everything to the default V-Ray settings when the program was first installed. If I have been experimenting with settings and things are getting weird with the outputs, I will often hit this button to start from scratch. Next to that is the “Load” button which allows you to load past settings which have become a big time saver in our studio.
Global Settings Tab
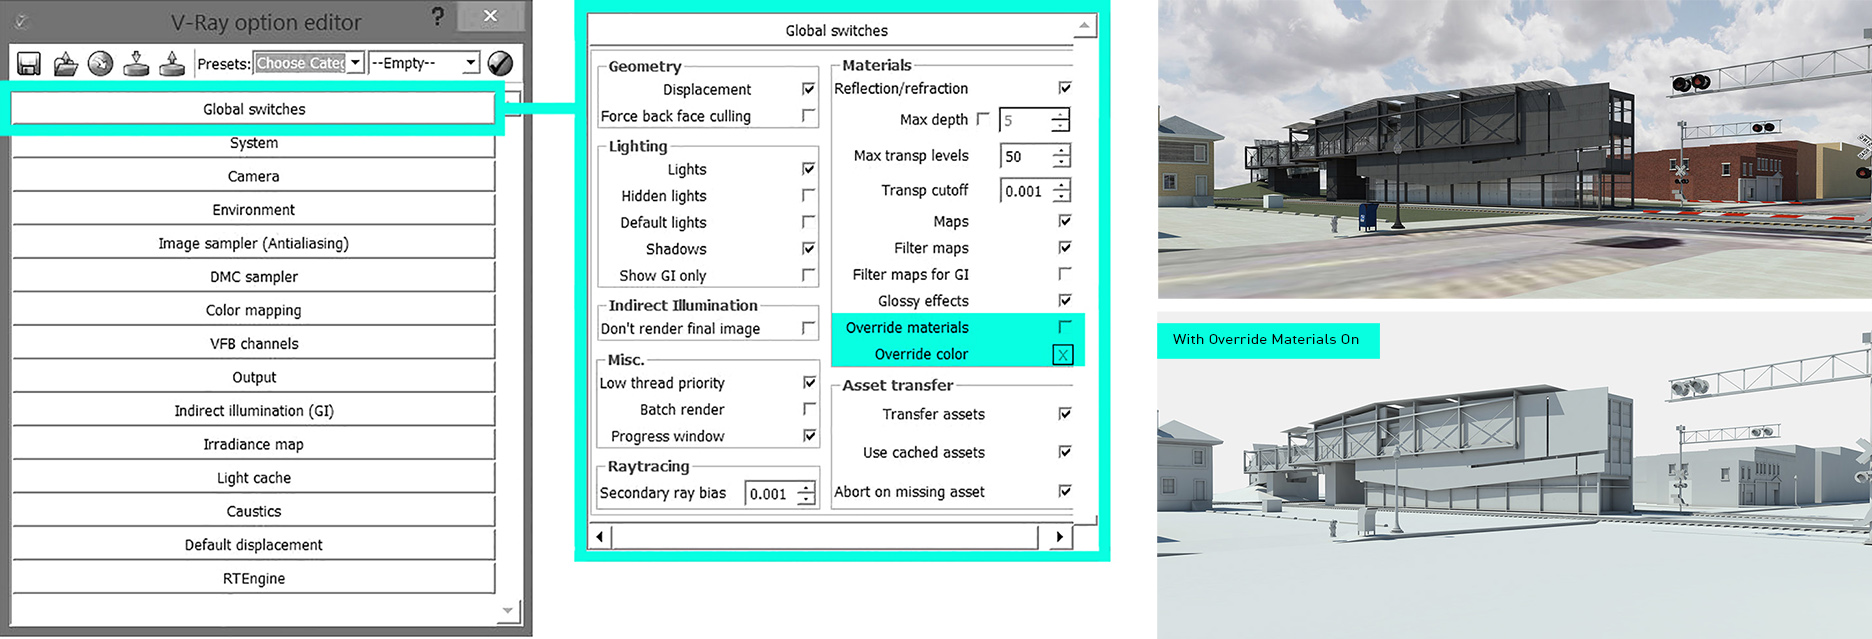
In this tab, I really only use the “Override Materials” check box. This will override all materials in the model and replace them with a single material color. This is the box I check when I create clay model renderings.
Camera Tab
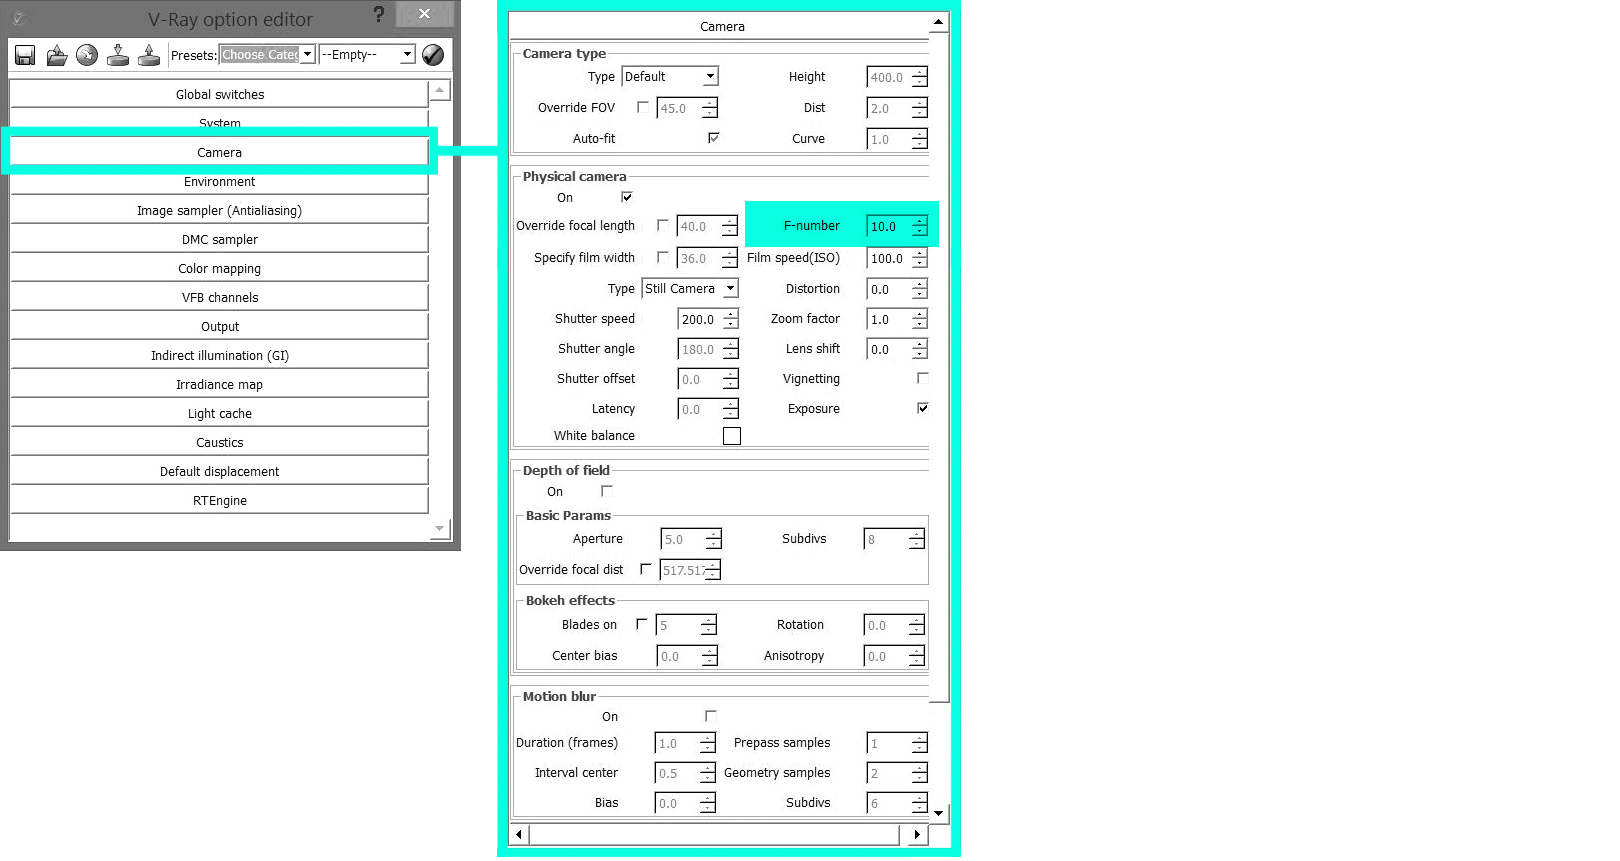
This tab controls things like exposure of the rendering similar to how an SLR camera works. I usually leave the default settings the same except for the F-number which I change from “8” to “10”. This slightly darkens the final output so that the white materials don’t get washed out. For interior shots or dusk scenes where there is low light, these settings will need to be adjusted accordingly.
Environment Tab
This tab controls the overall lighting of the scene. The GI (Skylight) box controls the sun specifically. Again, the default V-Ray settings are tied to the Sketchup sun. Therefore, changing the sun angle in Sketchup changes the sun angle here in V-Ray. If you have a dusk shot, then you can tweak the sun color or use an HDRI image to generate the light. For this daytime rendering, I left everything at the default settings.
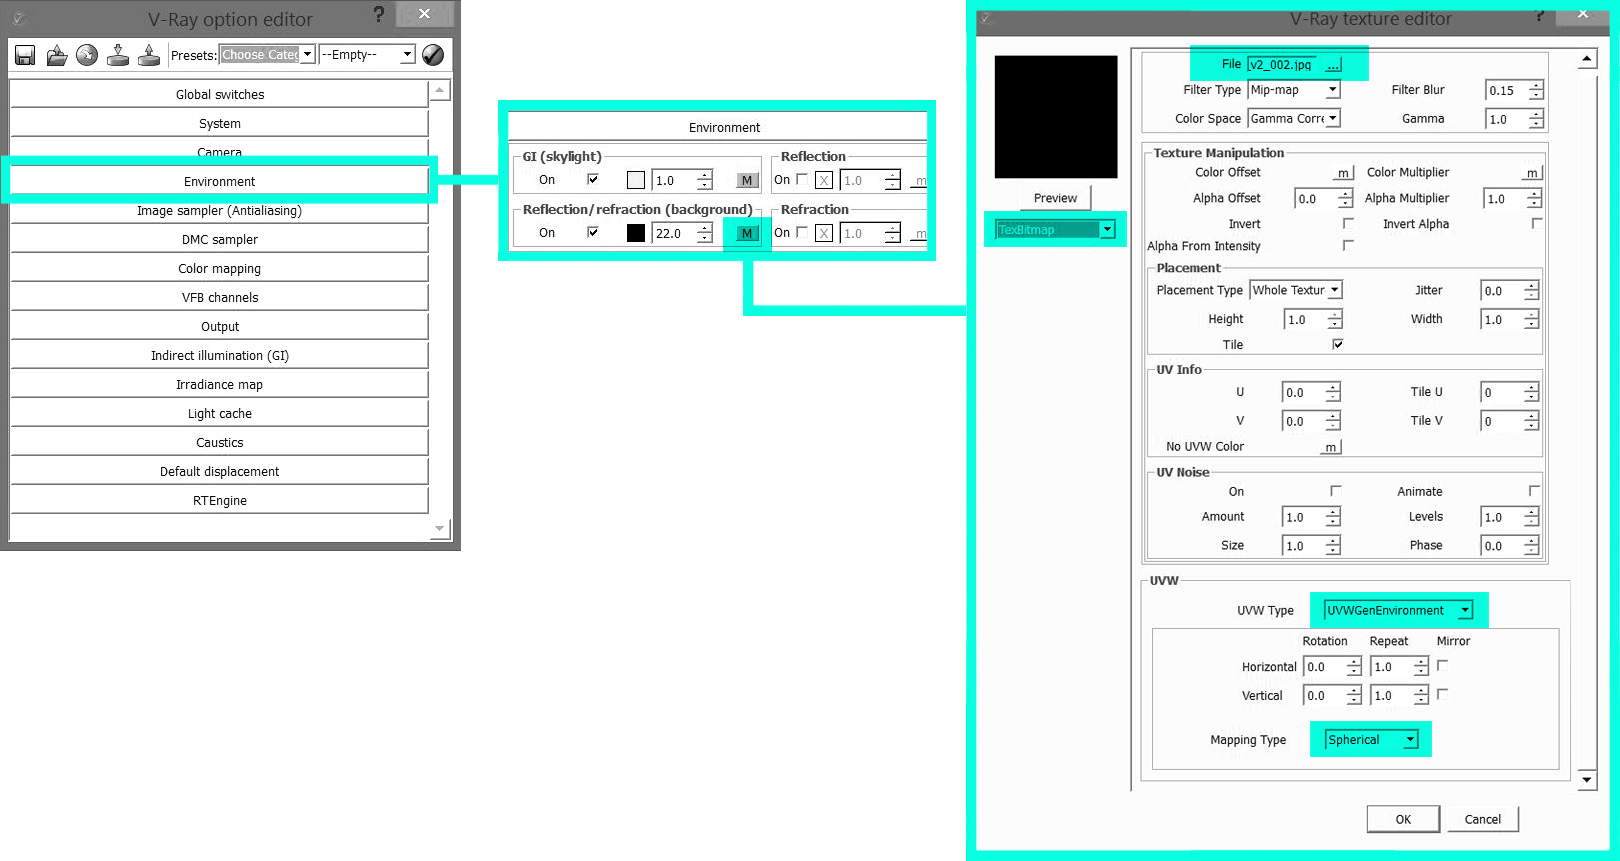
The “Reflection/Refraction (background)” controls what you see in the background/sky. Here, I often add a sky image so that it will be seen in the reflections of my model.
To add a sky, I choose the “M” in the “Reflection/Refraction(background)” box. In the drop down under the preview, I choose “TexBitmap”, and load a spherical sky image. I also make sure to choose “UVWGenEnvironment” in the drop down next to UVW Type. You can find spherical skies online and through Google image searches.
VFB Channels Tab
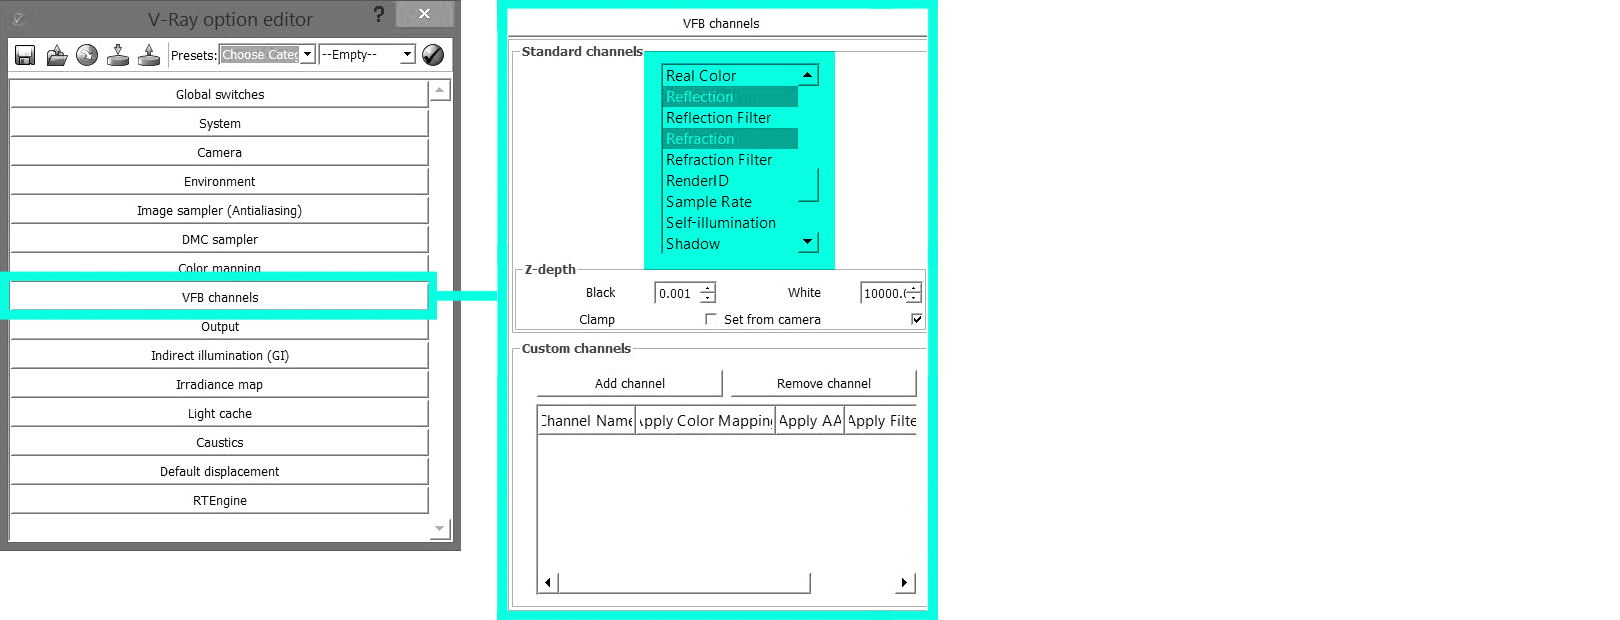
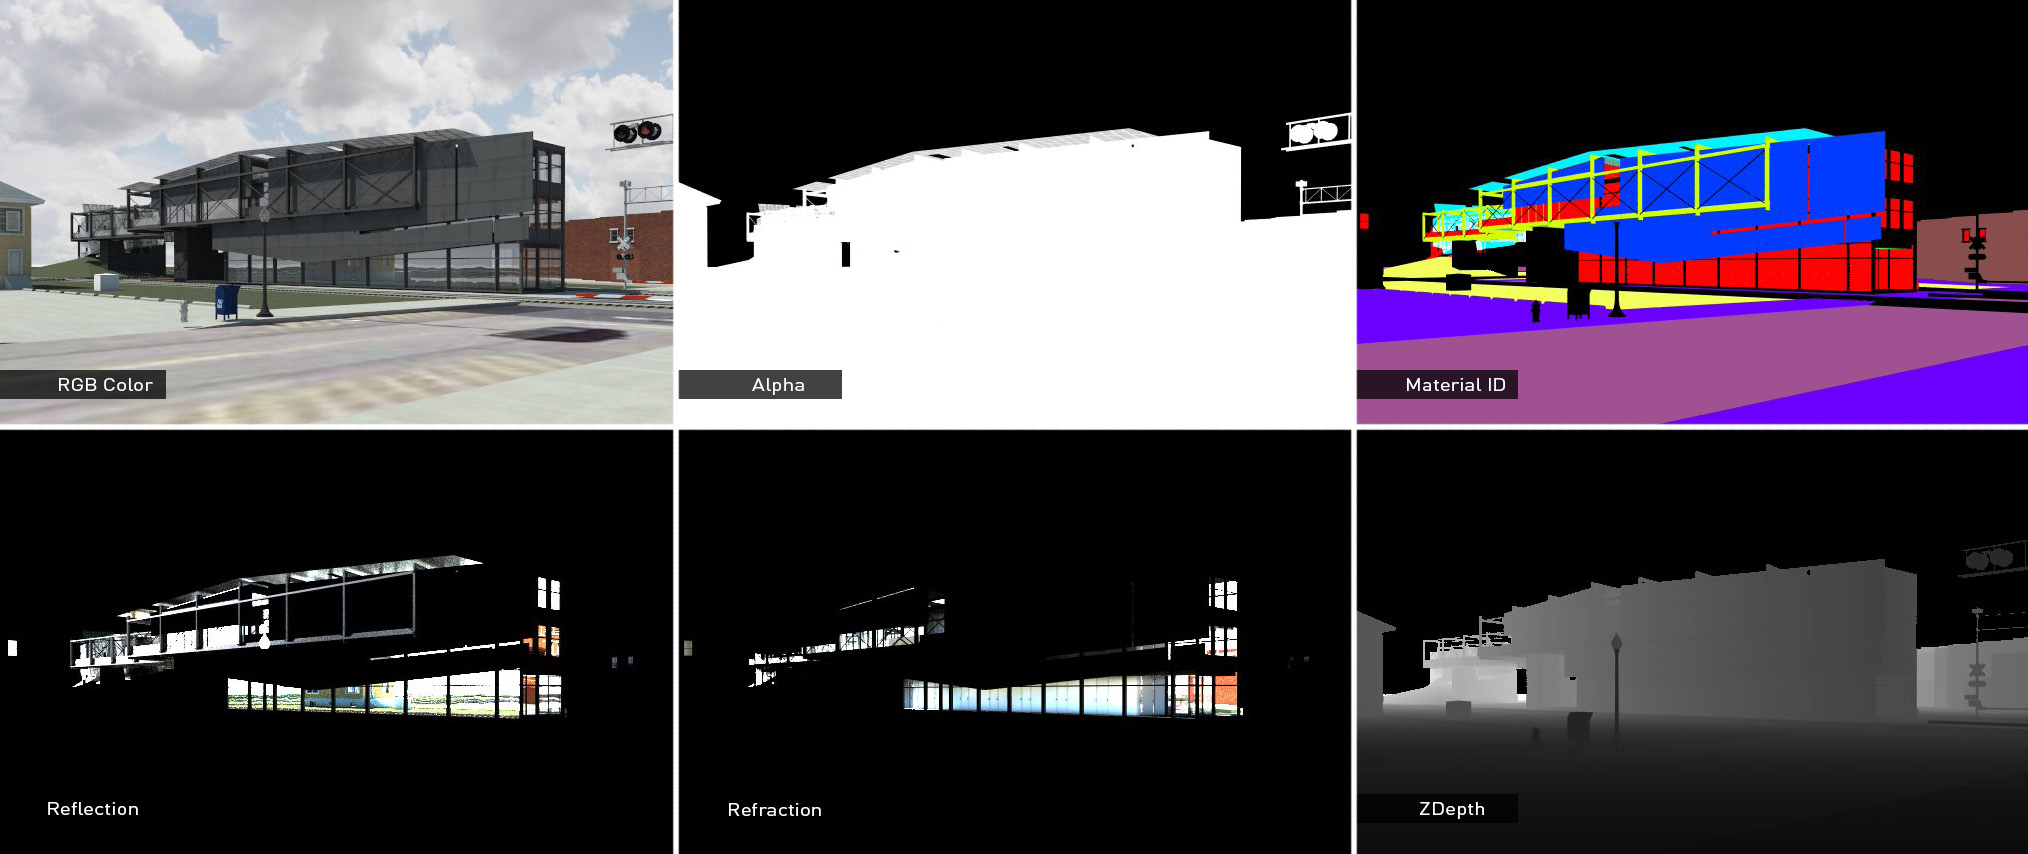
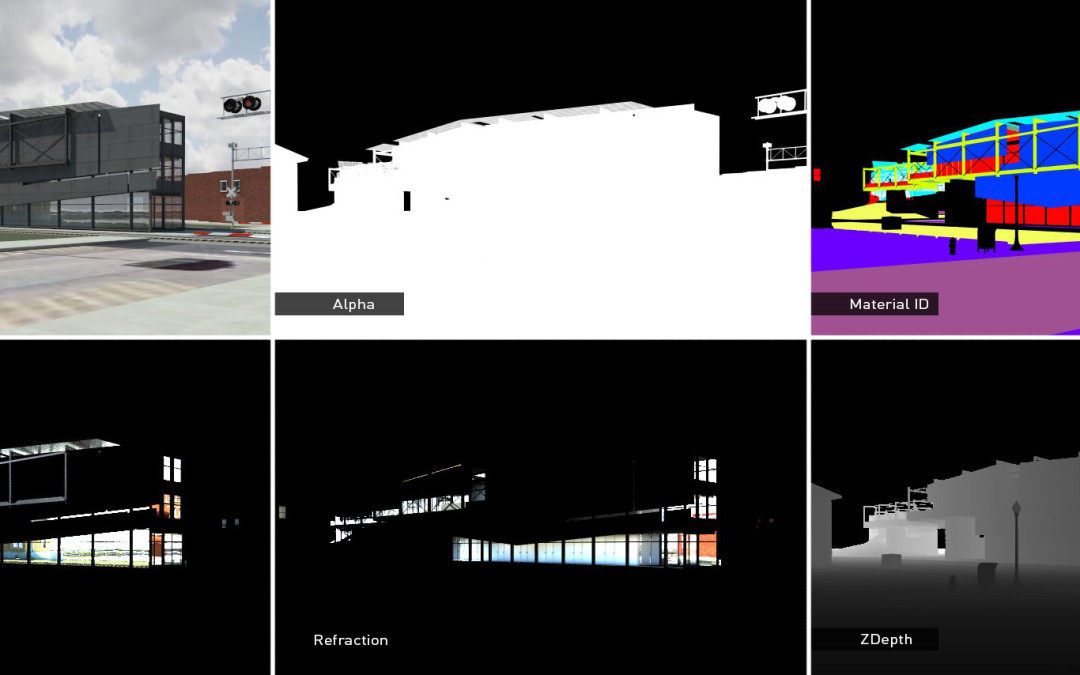
Here, you can set up extra channels to be generated along with the rgb color image. In other words, you create images that separate out information such as reflections, lighting, and shadows, which can then be used as separate layers in Photoshop. For example, I often select Reflection, Refraction, ZDepth, and Material ID for almost every rendering I do. The Material ID is especially helpful to make quick selections of materials.
Output Tab
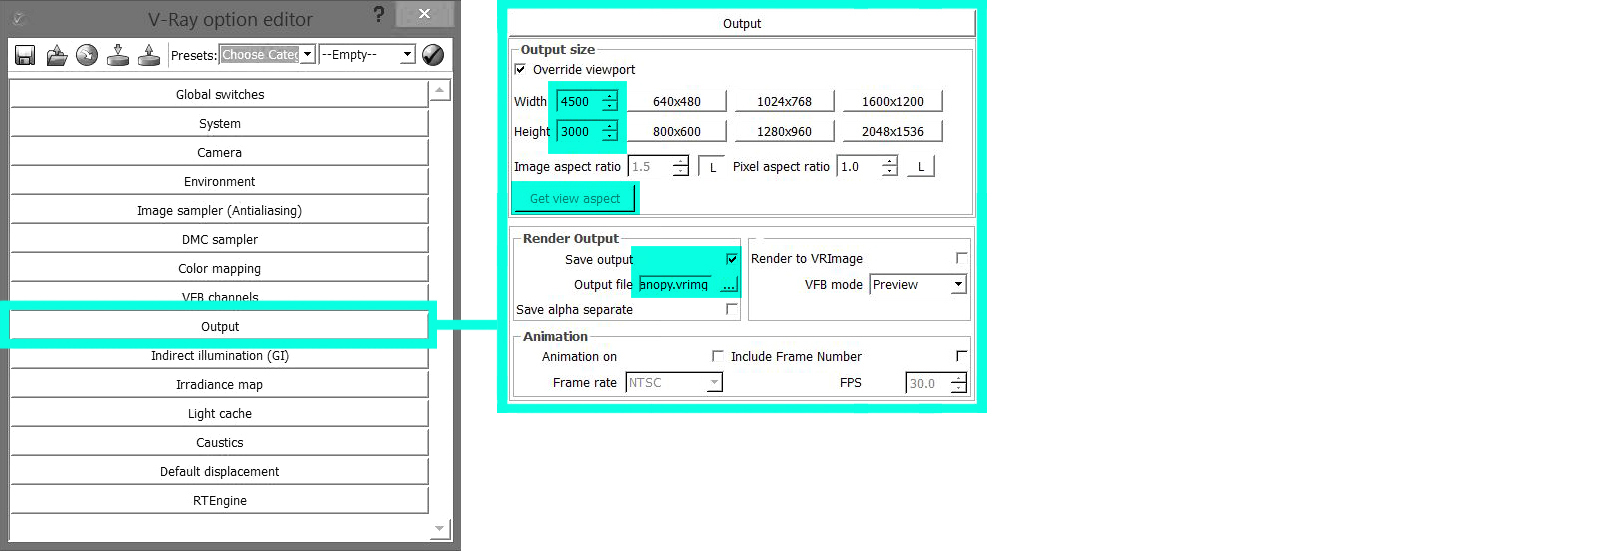
This is where the resolution is set and where I tell V-Ray to save the file. For quick test renderings, I set the resolution to 1200×800. For final renderings, I will bump up the resolution to somewhere between 4500 and 5000 px though I often suggest students can get away with 3000 px images to save time.
If I need the proportions of my renderings to exactly match my Sketchup window, I will select the “Get view aspect” button. This grabs the aspect ratio of the Sketchup model space and applies it to the V-Ray aspect ratio. This is useful if you are overlaying Sketchup line work exports over the V-Ray rendering and want things to match up perfectly.
Finally, under “Render Output”, I check the box next to “Save Output”. Under that, I browse to a location where I want the files to be saved and save them as Tiffs. By choosing these options, V-Ray will automatically save the final images along with the channels once everything is finished rendering.
Indirect Illumination GI
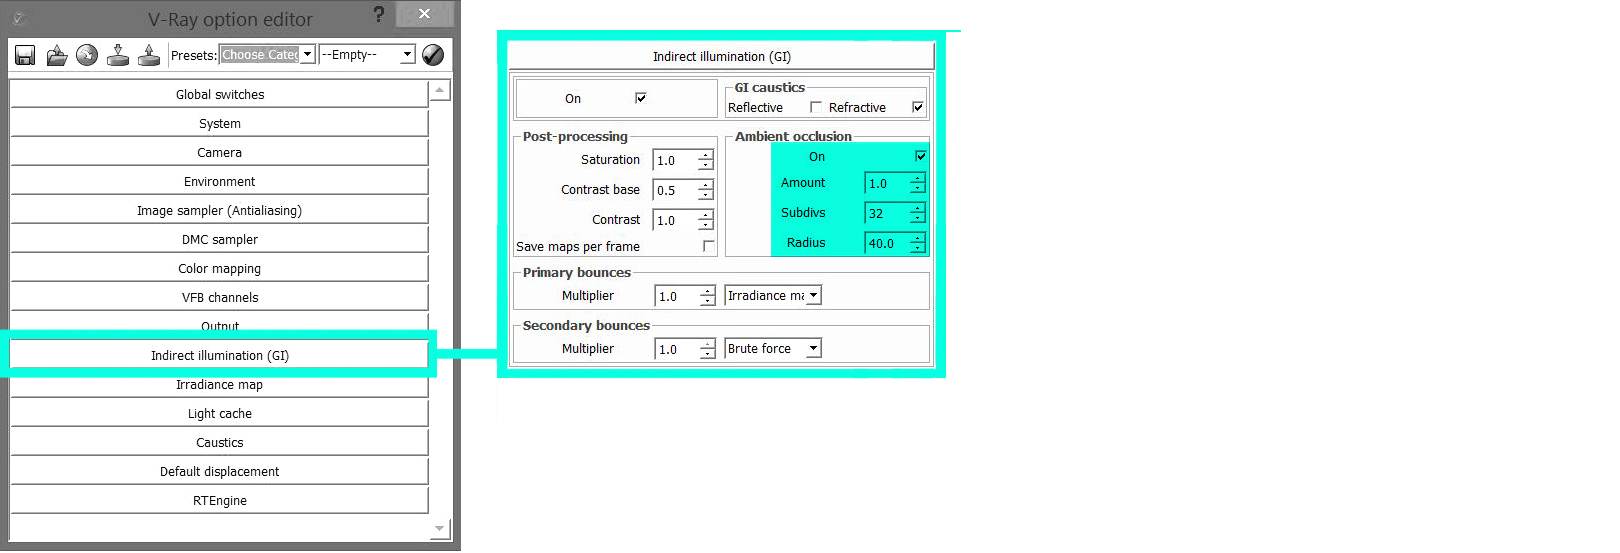
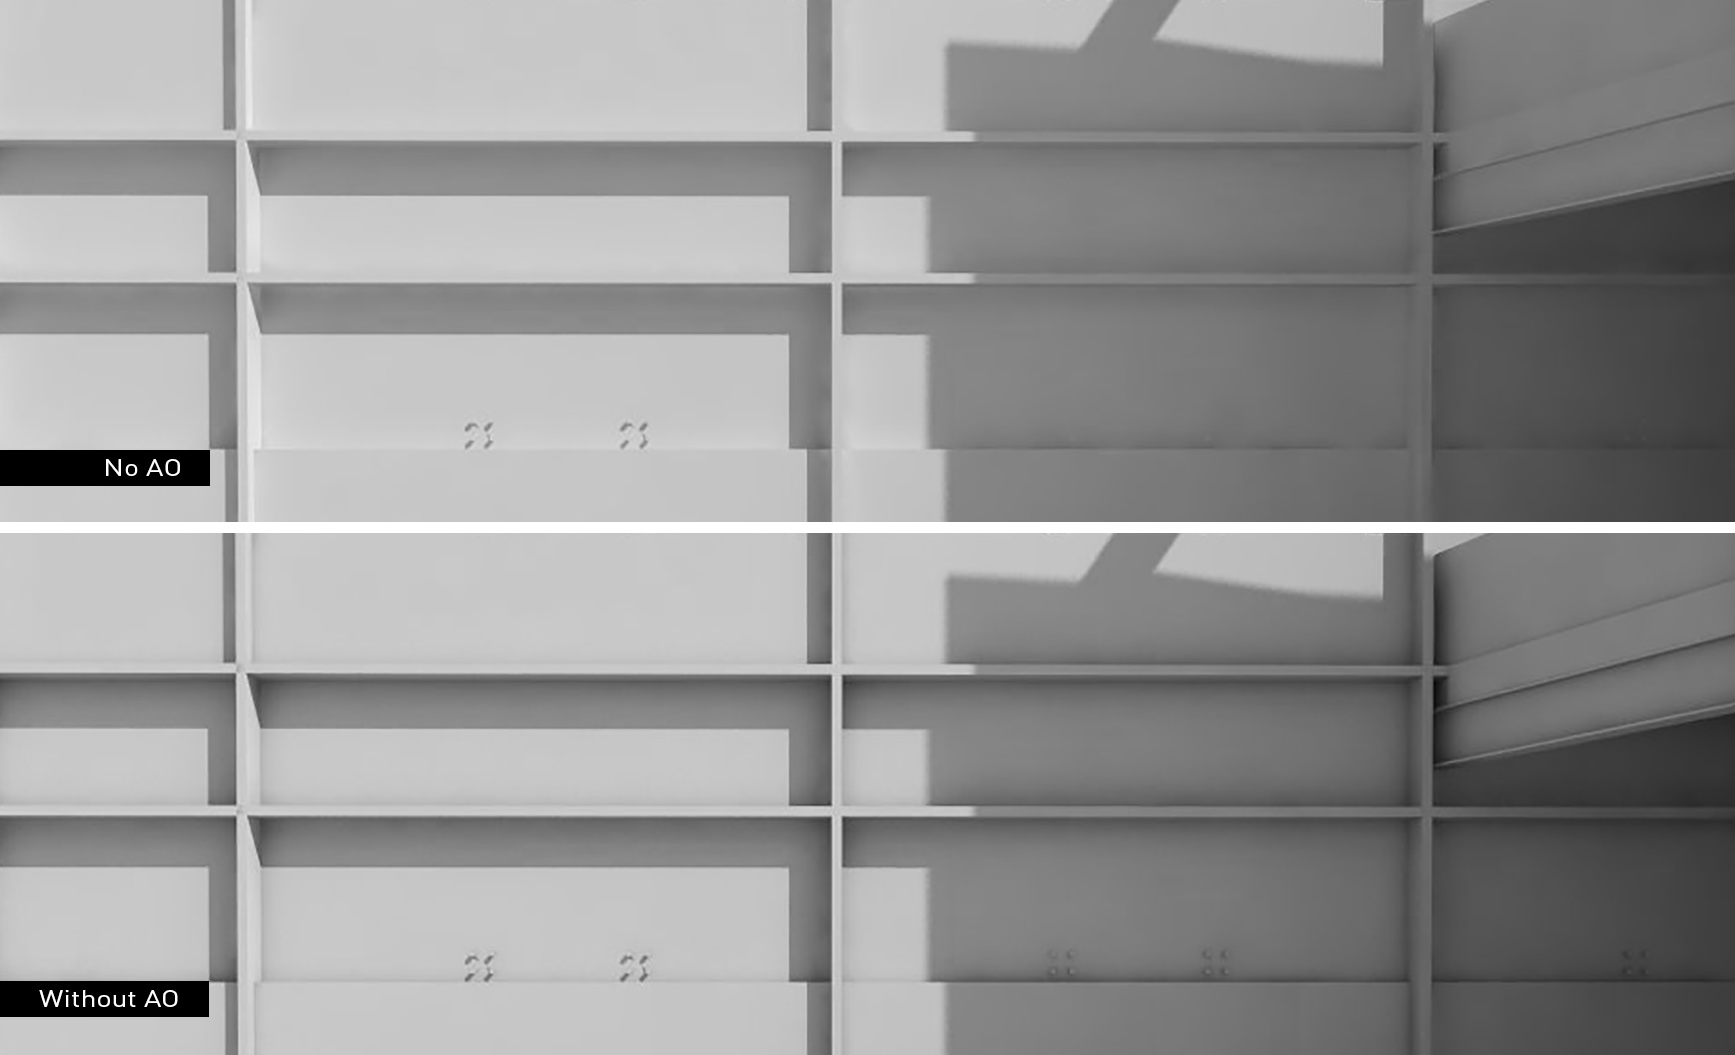
In this tab, the only thing I am concerned with is the “Ambient Occlusion” box. Ambient occlusion will add shadows into the corners of the geometry which adds realism and clarity to the renderings. This is one of the reasons why I moved to V-Ray. Here, I check the box next to “On”, set the “Amount” to 1 (controls how dark the shadows are), change “Subdivs” to 16 (controls how smooth the shadows are), and set the “Radius” to 35 (how much the geometry will influence the shadows).
As I mentioned above, this is meant to be a brief overview of a typical daytime scene setup that I use. Sometime in the future, I will go over more complex stuff like night scenes, interior scenes, AO passes, dome lights, HDRI, etc. I will try to update this post as the software evolves or if there is information that I forgot to include.
**********************************************************************
 |
| 匯出.png |
 |
| 用PS CC開啟.png |
 |
| 結案 |
最後,本蟲於N年前就曾經以CAD 3D ren出上面這種效果,但......我忘記怎麼設定了QAQ,而且查了老半天還是沒成功...
這個部落格的主要功能就是紀錄學過的技術阿~若十年前即開張,肯定會更加強大~